动态计算图框架,根据运行时定义计算,可以在迭代中修改计算图,最终对标量输出节点使用 .backward() 实现自动求导并将梯度累积保存在 .grad 里。比如,想要知道模型分类不够理想的地方表现在输入图像的哪些区域上,可以这样做:
| |
相比于别的框架,PyTorch 好在和 Python 理念一致,都是以简单、便捷为首要目标,不需要斟酌计算图的构建细节,也没有一个功能对应一千种 API 的繁琐,最大的缺点是性能以及部署生态没那么完善。
机制
CUDA 内存申请
CUDA 初始化时会创建 CUDA context 占用几百兆左右的显存,该占用量随版本和设备变化。
由于向 CUDA 申请显存会很耗时间,所以 PyTorch 一次会申请一块较大的显存,也就是 reserved memory。
在 Pytorch 中,CUDA 内存以内存块的形式存在,在你创建一条 4 Bytes 的 Tensor 时,默认情况下,Pytorch 会向 CUDA 申请 2 MB 的内存块,然后再为我们分配 512 Bytes 的显存来储存我们申请的 Tensor。剩余的 1.5 MB 以 reserved memory(以前叫 cache memory)的形式保持占用。假设这时候,你想再申请一条 Tensor,Pytorch 首先会去看之前申请的内存块够不够放。如果我们申请的 Tensor 小于 1.5MB,那就直接放在刚刚申请的内存块中。如果大于 1.5MB,Pytorch 则再向 CUDA 申请新的内存块。假设 CUDA 也没有足够内存的时候,Pytorch 会尝试切分释放掉这些内存块中闲置的部分,再重新向 CUDA 申请。如果还不够,那就会报我们模型训练中常见的 out of memory 错误了。
模块
模块可以嵌套,但需要设为其属性,也就是以 self.xxxx 或 setattr(self, name, xxx) 的形式设置
Parameter
模块的参数定义,如果不设置 requires_grad=False 的话意味着这个参数将纳入模型训练更新中
如果有参数需要保存但不需要优化,可以使用 self.register_buffer() 的方法注册到缓冲区中,该方法的缓冲参数不会在 model.parameters() 中返回,所以不会被优化器优化
BatchNorm
BN 层的运作依赖模块的工作模式 train() 和 eval(),以及初始化时的 affine 和 track_running_stats 参数
affine=True:建立相关的仿射变换参数(也就是 weights 和 bias 参数),用于对输出范围做重新映射,一般用默认值不用管track_running_stats=True:建立累计train()时前向经过的 batch 的统计量的缓冲区,会有个momentum=0.1来确定累计更新的动量(该缓冲区的参数running_mean、running_var等只在eval()时会用作 batch 归一化,train()时还是会用当前 batch 的统计量来归一化)。当track_running_stats=False时,只会用当前的 batch 统计量来做归一化
具体计算式如下: $$O=\frac{I-mean}{\sqrt{var+eps}}\cdot weight+bias$$
Sequential
可以用来初始化一串模块,会顺序执行
| |
ModuleList
初始化一堆模块。和 Sequential 不同的地方在于其不实现 forward,也就是不规定按顺序执行。和 list 的不同之处在于其元素自动归为 Module 的一部分会一起初始化
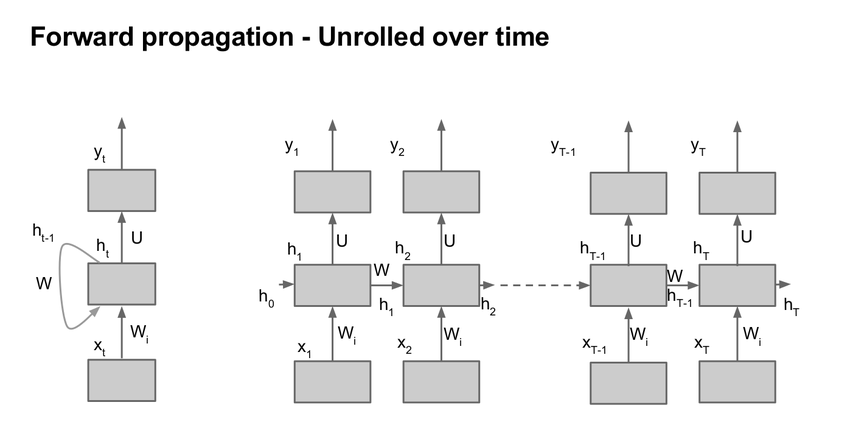
RNN
多层 Elman RNN 的实现,也就是一般的 RNN
$$ht=tanh(x_tW_{ih}^T+b_{ih}+h_{t−1}W_{hh}^T+b_{hh})$$
| |
- 注意
batch_first默认为False,也就是说 batch size 在第二位,比如输入是[Length,Batch,H_in],输出是[Length,Batch,H_out],中间状态为[Layer,Batch,H_out] - LSTM 接口也类似,但多了一个中间记忆状态
c,参数还有门控的输入、遗忘、输出
结构
Tensor
类似 numpy 的数组,torch.view() 类似 numpy.reshape(),转换:
| |
Tensor 包含:
.requires_grad:True则跟踪所有基于它的操作,可以通过.backward()来计算梯度,梯度结果保存到.grad中,默认为False。注意传播后计算得到的梯度是通过累加的方式保存到.grad中的,所以参数更新前需要通过optimizer.zero_grad()清空梯度.detach():从计算图中分离出来,也就是会切断反传路径,而.requires_grad不会切断(global loss 依然会计算传递回去).backward(optional):单数据标量不需要参数,否则要指定传过来的梯度 Tensor 作为参数。retain_graph=False:默认计算图只反传一次就释放,所以如果计算图有多次利用,则需要将它设为True
.grad_fn:指向计算该 Tensor 的函数.to(device):送到指定设备(CPU/GPU)上运算,运算需在同一设备,如果不急着使用数据,可以同时对pin_memory数据设置non_blocking=True来异步传输数据,更多见 [[#^69d2e9|dataloader]].data:不安全,似乎是隔开反传用的,现用.detach()替代,返回内存与 Tensor 共享,和直接操操作 Tensor 似乎没什么区别
方法记录:(函数加下划线表示 in-place 操作)
- 排序:
a.sort(axis),沿 axis 维度做排序,输出a.sort(axis)[0]、a.sort(axis)[1]分别代表排序后的 Tensor 和排序对应 index - 最大值:
a.max(axis, keepdim),类似a.sort,keepdim 为 bool 值,置为 True 则保留维度,即(96, 10) max(1, True) -> (96, 1) - 矩阵运算:
a.shape = (1,24), b.shape = (10,1), (a+b).shape = (10,24),意思是 Tensor 中垂直向量加法会扩展为矩阵,加一行加一列这样。- 多维矩阵乘法
torch.bmm(a, b),a 为(b, n, m),b 为(b, m, p),输出(b, n, p),这里 b 是批次,n 不清楚,似乎随意?
- 多维矩阵乘法
- reshape:
a.view(-1, 2)/a.reshape(-1, 2),都是改变形状,Tensor.reshape()会在内存不连续时调用Tensor.contiguous()以返回一份 copy 再调用Tensor.view() - 扩增:
a.expand(3, -1),将 a(n, )复制扩展成(3, n)torch.repeat_interleave(a, 2, dim=0),沿 0 维重复元素 2 次,如[0,1,2] => [0,0,1,1,2,2],在 CUDA 上扩增多个维度没有torch.nn.functional.interpolate(a, scale_factor=2, mode='nearest')快
- 堆叠/展开: ^e3b3d9
torch.nn.Unfold(kernel_size, dilation=1, padding=0, stride=1):相当于卷积的前置操作。Tensor 也有类似算子,不过只能是一维的。返回[N, C x ks^2, -1]的 Tensor,如果 ks 和 stride 相同则相当于图像切片展开,可以转换为这样[N, C, ks_h, ks_w, patch_h, patch_w]
- 填充:
F.pad(x, [1,2,3,4]):padding 算子,第二个参数类似 copyMakeBorder,也就是对应[left, right, top, bottom, first_c, last_c],可以缺省
- 仿射:通过
F.affine_grid(theta, size)和F.grid_sample(img, grid)来实现仿射变换,但和通常的实现方法的有所不同- PyTorch 会在处理前将输入输出坐标系缩放到 [-1, 1],零点为图像中心点。由于输出范围固定为 [-1, 1],所以输出的大小
size代表的是输出网格的分辨率而非 OpenCV 的从输出空间中截取的区域大小dsize - 假设 $I(x, y)$ 和 $O(u, v)$ 分别为 输入空间 和 输出归一化空间
- OpenCV 的 warp_affine 方法为:$I(x,y)$->$O(x,y)$,仿射矩阵为
M,处理过程就是输入一个 $I(x_0,y_0)$ 变换得到对应的 $O(x_0,y_0)$ - PyTorch 会先用
F.affine_grid()输入size大小的输出空间网格 $O(x,y)$,输出一张含有输入归一化坐标 $I(u,v)$ 的输出网格grid$O(x,y)$,表示输出网格的像素对应于输入归一化空间的哪个坐标,也就是 $O(x,y)$->$I(u,v)$(由于归一化在内部自动完成,所以实际的处理矩阵theta为 $O(u,v)$->$I(u,v)$ 的变换矩阵,也就是将M变换到输出归一化空间且后再取逆)。最后在经过F.grid_sample()从输入归一化空间中采样出像素映射到输出网格中。处理过程为:输入一个 $O(x_0,y_0)$,内部归一化得到 $O(u_0,v_0)$,变换得到 $I(u_0,y_0)$,采样得到 $I(x_0,y_0)$ 值
- OpenCV 的 warp_affine 方法为:$I(x,y)$->$O(x,y)$,仿射矩阵为
- 详细推导参照 https://www.zhihu.com/question/294673086
- PyTorch 会在处理前将输入输出坐标系缩放到 [-1, 1],零点为图像中心点。由于输出范围固定为 [-1, 1],所以输出的大小
| |
在使用 CUDA 时,需要对各个参数和缓冲区转成 CUDA 张量 net.to(device) 和 inputs, labels = inputs.to(device), labels.to(device),其中 device = torch.device("cuda:0" if torch.cuda.is_available() else "cpu")。另外,使用 .cuda() 也可以达到同样的效果而且速度会快些
Variable
类似 Tensor,已 deprecated
.requires_grad:同 Tensor.volatile:和requires_grad相反,表示是否不参与求导,为True时它及依赖节点不求导,优先级比requires_grad高
nn
用于模块化神经网络的接口。nn.functional:没有学习参数的一些神经网络函数,如 ReLU、Pool 等。
网络定义:
| |
列出名字和参数:
| |
utils
torch.utils.data.dataloader: ^69d2e9
pin_memory=False:是否使用锁页内存(锁页就是锁定内存页,不让其用于磁盘交换,比如 GPU 显存就无法交换到磁盘,但 CPU 用虚拟内存会可能和磁盘交换)。该标志会将数据加载到锁页内存,从而接下来不需要 CPU 参与就能传输数据到 GPU(GPU 的 DMA 直接从锁页内存拿数据),坏处是可能会出现问题,看系统是否卡住或者 swap 有没爆来决定开不开,而且非锁页内存数据传到锁页内存也需要时间。配合Tensor.cuda(non_blocking=True)可以实现异步传输,更多见:- https://discuss.pytorch.org/t/should-we-set-non-blocking-to-true/38234/3
- https://discuss.pytorch.org/t/guidelines-for-assigning-num-workers-to-dataloader/813/15?u=lamply
- [[操作系统内存管理-202201171131]]
- (不过实际在远程机上尝试发现速度完全没有加快,这可能是因为瓶颈并不在这方面上,而且使用锁页内存也会导致各种其他系统问题导致延迟)
- 似乎是要配合 non_blocking 进行 CPU->GPU 才会有加速,二者缺一不可,毕竟非 pin_memory 的话传数据还是要占用 CPU I/O,相当于 blocking 了
num_worker:dataloader 创建的工作进程数,并使用batch_sampler指定 batch 和 worker,然后各个 worker 将各自 batch 加载进 RAM,最后 dataloader 从 RAM 中寻找需要的 batch。设置越大,batch 预备得越多,内存和 CPU 消耗也大,设置为 0 则不会自动加载到 RAM,一般设置为 CPU 核心数,但如果核心很多对共享内存要求会很高(而且速度还不一定会更快,尝试过 [64 bs, 32 worker],[32 bs, 32 worker],[32 bs, 16 worker],[16 bs, 16 worker],[8 bs, 8 worker] ,[8 bs, 4worker],batchsize 非瓶颈(但和 worker 匹配会更快),10 核服务器 cpu,worker 为 16 或 8 时最快)
更多请参考 https://www.cnblogs.com/hesse-summer/p/11343870.html_
如果想要更快的训练速度,需要明确瓶颈所在,CPU、GPU、I/O,大的 batch size 一般会被 I/O 限制,复杂的 augmentation 以及编解码会被 CPU 限制。
- 对于 I/O,如果不是十分频繁读写而且很大的批次(128 以上),一般不会成为瓶颈,使用
lmdb/tfrecord会有帮助,此外还有一些非阻塞 I/O 如tf.io.gfile.GFile(img_path, 'wb')可以改善 - 对于 CPU,迁移预处理操作到 GPU 上(
DALI),或事先做好部分预处理,加上PyTurboJPEG等加速编解码,以及给Dataloader加上 fast_collate 和套层 prefetcher - 更多见:https://discuss.pytorch.org/t/how-to-prefetch-data-when-processing-with-gpu/548/18
loss函数
定义在 torch.nn 或 torch.nn.functional 里。需要注意这里的 loss 函数和 Tensorflow 的 loss 函数很有可能默认参数、输入顺序和实现细节是不同的,总之__如果要跨框架复现,在使用之前一定要对数值进行检查!__
torch.nn.CrossEntropyLoss(weight=class_weights, ignore_index=0):交叉熵,用于分割的 lossweight为 shape=(C, ) float32 数组,用于平衡类别 loss,如果 GPU 训练则还需要先.cuda()送入 GPUignore_index为忽略的类别,值可以在 C 外,好像是不会传相应类别的梯度回去- 输入为 NxCxHxW 的原始网络输出(未经 softmax)和 NxHxW 的 long 型标签(值域为 [0, C-1])
torch.nn.BCELoss:二值交叉熵,需要事先做sigmoid,除非用BCEWithLogitsLossBCEWithLogitsLoss和CrossEntropyLoss区别在于前者可以软标签(0.0-1.0),后者是硬标签(整型 0-C-1),更多见 https://discuss.pytorch.org/t/loss-function-crossentropyloss-vs-bcewithlogitsloss/16089/4
torchvision
torchvision.datasets:拥有很多数据集
torchvision.models:拥有很多预训练模型
torchvision.transforms:用于预处理的函数,用于 datasets 时的 transform 参数传入
cuda
torch.cuda.synchronize():用于同步设备,因为 python 一般不会等待 GPU 等外部设备计算完毕(除非 Tensor.cpu() 这种传回来的操作 pytorch 会自动 synchronize),加上这个显式同步可以用于的话就会停下来直到设备上的计算完成。计时的时候会用到,如:
| |
torch.backends.cudnn.benchmark:设置 True 使 cudnn 寻找当前尺寸网络的最佳运行算法,详见参靠资料
参考资料:
https://pytorch.org/docs/1.7.1/notes/cuda.html#cuda-semantics
https://zhuanlan.zhihu.com/p/73711222
方法
数组操作
- 扩维:
.unsqueeze(axis)
参数设置
需要反传的参数需要用 nn.Parameter(data=x) 来加到 nn.Module 的变量里,如:
| |
注意待参数 self.target 和 self.smooth_val 需要保持 PyTorch Tensor 操作,不能通过 float() 之类的转换成 Python 变量,不然会切断反传路径无法更新
随机种子
| |
数据加载
pytorch提供 Dataset 类来构建数据集,并通过 Dataloader 来读取。
Dataset 结构如下:
| |
DataLoader 会加载 batch 的数据,如果 dataset.__getitem__(idx) 返回的是 512x512 大小数据,则会 batch 成 nx512x512,如果是 3x512x512 则 batch 成 nx3x512x512
DataLoader 的常用方法:
| |
安装第三方库 tfrecord 可以读 TFRecord:
| |
分布式下的表现见下文[[#多卡 分布式训练]]
更多见:https://ptorch.com/news/215.html
预处理
OpenCV 解码 .jpg 比 PIL 快一些,解码 .png 比 PIL 稍慢一些,两种库解码出来的 JPEG 图会有一些差异
| |
transforms.ToTensor() 会将整型数除上 255 来转成浮点,而如果本身是浮点则直接转成 tensor。最后这个要放在 transforms lists 的图像处理之后归一化之前
训练
简易的训练过程
| |
多卡/分布式训练
原生
最好不要使用 torch.nn.DataParallel,有非常多的 bugs(不过就是挺简单的,v1.11 后弃用)。属于单机多卡 parameter server 模型,以 0 卡为主卡来计算和分发权重,GPU0 会占更多显存,速度也会被限制
| |
官方提倡 DataDistributedParallel:
The difference between DistributedDataParallel and DataParallel is: DistributedDataParallel uses multiprocessing where a process is created for each GPU, while DataParallel uses multithreading. By using multiprocessing, each GPU has its dedicated process, this avoids the performance overhead caused by GIL of Python interpreter.
除此之外,还有提供了像 SyncBN 之类的东西,只支持 DataDistributedParallel
| |
推荐使用 Pytorch 自带的分布式训练脚本来启动训练,这样会自动创建相关进程、设置环境变量以及传入 local_rank 参数来指代本地机器的 id
CUDA_VISIBLE_DEVICES=0,1 torchrun --nproc_per_node=2 train.py
CUDA_VISIBLE_DEVICES 变量可以限制实际只能看到的 GPU0 和 GPU1,如果是只用 CPU 则设为 -1
工业级的标准实践请参照这个:https://github.com/NVIDIA/apex/tree/master/examples/imagenet (原生 pytorch 版: https://github.com/pytorch/examples/tree/master/imagenet )
注意:
- 如果是多机分布式训练的话,每个机器(Note)都会持有持有自己的
local_rank(对应进程),也就是会出现多个local_rank == 0的情况,这时候要用torch.distributed.get_rank()之类的方法拿到全局的 rank - DataParallel 的 batch size 是总的 batch size,各 GPU 会获得其中一份,而 DataDistributedParallel 的 batch size 是各 GPU 的 batch size
- 如果要通过 model.module 之类的方法修改模型参数,那不能只限 local_rank == 0 做,不然模型参数会不同步(分布式 backward 时使用 all_reduce 算法保证各 worker 模型参数一致,其余方法需自己手动保持模型参数一致)
- 分布式训练多节点最好保持相同的计算结构,也就是前向过程尽量不要使用 if-else 来定义计算图,而是使用乘 0 乘 1 来做计算路径分支 ( https://zhuanlan.zhihu.com/p/592515484 )
- 多机分布式错误:
1 2 3AssertionError: optimizer.zero_grad() was called after loss.backward() but before optimizer.step() or optimizer.synchronize(). This is prohibited as it can cause a race condition
horovod 框架下遇到,在使用多个 optimizer 时出现,前一个 loss 的 backward 影响了后一个 optimizer,需要在后一个 optimizer 调用 zero_grad() 前加个 optimizer.synchronize(),见 https://github.com/horovod/horovod/issues/1417
参考:
- https://zhuanlan.zhihu.com/p/250471767
- https://zhuanlan.zhihu.com/p/98535650
- https://pytorch.org/docs/master/notes/amp_examples.html
- https://gist.github.com/mcarilli/213a4e698e4a0ae2234ddee56f4f3f95
- https://discuss.pytorch.org/t/torch-cuda-amp-equivalent-of-apex-amp-initialize/132598/5?u=lamply
- https://pytorch.org/docs/stable/notes/amp_examples.html
DLC
Horovod 实现
| |
多机分布式
模型修改
| |
预训练
| |
LR策略
通过继承类 _LRScheduler 来实现,下为示例:
| |
推理
注意:
连续推理时,预处理后的数据最好全程放在计算设备上,减少数据交换次数。前处理和后处理也可以在 GPU 上进行以加速,设备间内存交换和加速应该需要看情况进行权衡。
| |
模型相关
模型保存
- 保存整个模型:
torch.save(model, 'asd.pth') - 保存模型参数:
torch.save(model.state_dict(), 'asd.pth')( Recommended ) - 脱离模型源码:使用 TorchScript,同时会有一些加速
1 2 3 4x = torch.rand((1,3,1024,768)).cuda() with torch.no_grad(): traced_cell = torch.jit.trace(model, (x)) torch.jit.save(traced_cell, 'model.pth')
模型读取
- 读取整个模型:
model = torch.load('asd.pth') - 读取模型参数:
model.load_state_dict(torch.load('asd.pth')) torch.load函数首先会将模型反序列化到 CPU 然后将模型移动到保存模型时该模型所处的设备,若没有该设备则报错,需要用map_location参数来进行映射,这在分布式训练时需要格外注意
| |
统计计算量
| |
模型参数显著性检查
| |
剪枝
非结构化剪枝的推理需要 Ampere 架构显卡和 TensorRT8 以上才支持
| |
模型转换
ONNX
对于所有 OP 都支持的网络:
| |
TensorRT
使用 torch2trt 的话
| |
工具
- 减缓显存需要:
pytorch-memonger - 可微 OpenCV:
kornia
新版本特性
2.0
功能上主要是新增了 torch.compile,也就是 JIT 编译,包装模型可以提升性能。用的是 Dynamo,相比于 TorchScript 更灵活,遇到不支持的部分会自动退回 eager 模式,所以算是固定了部分计算图,青春版。
日后可能会取代 TorchScript。
2.2
- Transformer 相关的性能升级,集成了 FlashAttention-v2,加快
scaled_dot_product_attention的速度。 - 引入了 TorchInductor 的一个专用版本 AOTInductor,用来处理优化
torch.export导出后的模型,同时可以生成一些共享库。基本上是给非 Python 的部署环境用的,目前还是原型阶段。
2.3
- 新增了个
torch.export的 dynamic shapes 的 API,torch.export.Dim,后续可以关注。 - 异步检查点生成,可以一边保存检查点一边训练,有点意思。
PyTorch/XLA
XLA(Accelerated Linear Algebra),一种基于 LLVM 的深度学习编译器,PyTorch 也有其支持。通过目标无关和目标有关两步走进行优化,其中流通的 IR 为 HLO。PyTorch 中 LazyTensor 使用 XLA 作为后端。
https://developer.huawei.com/consumer/cn/forum/topic/0201750315901780148?fid=0101592429757310384
https://zhuanlan.zhihu.com/p/392630428
问题
cuDNN error: CUDNN_STATUS_NOT_INITIALIZED:rm -rf ~/.nvRuntimeError: DataLoader worker (pid 6741) is killed by signal: Killed.:原因不明,可能是因为数据不允许多线程处理,或者共享内存不足,可降低 batchsize 试试。OSError: [Errno 12] Cannot allocate memory:当 num_workers > 0 时,CPU 内存使用会慢慢增加,直到爆掉,一个方法是数据集的__init__时不使用 Python lists(或 numpy arrays of type object)来保存数据,改用普通的 numpy array 或 tensor。具体讨论:https://github.com/pytorch/pytorch/issues/13246 ,也就是说,Python 多线程处理时multiprocessing.Array转换 Python list 时会触发引用计数,累积多了就会占满内存。- 运行一段时间爆显存:
torch.cuda.empty_cache() CUDA error: device-side assert triggered:输入数据(或标签)的 shape 与运算时期望的 shape 对不上导致ValueError: Expected more than 1 value per channel when training:因为对 1x1 的 feature map 做 batchnorm,如果 batch 为 1 则 1 channel 只有一个数据于是报错。如果是训练则需要设置高于 1 的 batchsize,同时 dataloader 要 drop last。Trying to backward through the graph a second time:某些东西多次反传了(如 GAN 的生成图在判别器和生成器反传了两次),或者其他未知原因- 最简单的方法是在前面的反传时设置保存计算图
.backward(retain_graph=True),但是会相当耗时( https://stackoverflow.com/questions/46774641/what-does-the-parameter-retain-graph-mean-in-the-variables-backward-method ),而且不一定行,可能是其他问题导致 - 正常情况下是因为部分变量在两次反传中都有使用,所以出现了问题。使用
.detach()调整反传路径,将不需要的部分去掉,隔离多次运用到的变量则问题解决 - 在某些情况下去掉分布式包装的
find_unused_parameters=True也能解决?原因不明,可能是版本原因(pytorch 1.11) - 异常情况下和模型有关,原因不明
- 最简单的方法是在前面的反传时设置保存计算图
torch._C._cuda_init() RuntimeError: Found no NVIDIA driver on your system.:在改了 cudnn 版本后出现的问题,在import torch后加上torch.cuda.current_device()即可解决,问题源自[[TensorRT初始化失败-202109131731]]RuntimeError: Error compiling objects for extension:编译自定义层时出现的问题,把编译器选项从cxx_args = ['-std=c++11']改为cxx_args = ['-std=c++14']就好了,看来可能是新的 pytorch 版本用到了一些新的 C++ 特性- 多 GPU 下使用
DataParallel封装模型在指针式参数输入时(outputs = model(*inputs, **kwargs))遇到了 inputs 顺序错乱?的问题,可能是内部分 GPU 处理时出现的问题,也可能是 DataParallel 引起的某种问题,只在 2 GPU 时出现,单 GPU 和 8 GPU 都没有出现。直接用model.module.forward(*inputs, **kwargs)没有问题,但是只用了单 GPU - 初次运行会比较慢,所有框架都会有的问题,与显卡运算优化有关,一般会在初始化后先运行几次来跳过前几次慢的部分。如果跳过后依然出现前几次推理速度很慢的话,那应该是其他的原因(I/O、日志等)
RuntimeError: Could not run 'aten::thnn_conv2d_forward' with arguments from the 'QuantizedCPU' backend.:QAT 量化时经常出现的问题,因为 QAT 时是 fp32 伪量化训练,而转换后推理时是 int8 真量化,所以可能是量化推理引擎不支持该算子,或者是这个算子 QAT 时是没有被量化的(训练时设置了module.qconfig = None),应该在运算前经过DeQuantStub- 分布式训练时 GPU 利用率 100%,使用
py-spy查看发现锁死在 SyncBN 处,最终发现是在打印 loss 时为了同步各个 worker 的 loss 值而使用了torch.distributed.all_reduce(),但是却放在了打印 loss 的if local_rank == 0下面,也就是只有 worker 0 到达了这个函数,而其他 worker 无法到达,直到运行到 SyncBN 处的torch.distributed.all_reduce()也等不来 worker 0,形成了死锁 - 分布式训练 GPU0 的显存占用明显比其他大,这种不平衡问题本来应该是
DataParallel才会有的。仔细分析发现 GPU0 显存暴涨是在amp.initialize()之后才会出现的,但是经过剖析发现有一个子模型的预训练参数 state_dict 是保存到cuda:0的,所以在读取时每个 worker 都将该子模型参数读到了cuda:0,进而导致了 GPU0 显存暴涨,修改为保存到cpu中然后在读取后.cuda()分配到各个 worker 的 GPU 上则问题解决 - 多进程 CUDA 推理卡住。CUDA 多进程似乎有其他的要求,而且
torchvision.tranform似乎会在多进程中卡住,原因不明,更多见 https://pytorch.org/docs/stable/notes/multiprocessing.html RuntimeError: Expected to mark a variable ready only once.:在一些特定模型上进行 DDP 训练才出现的问题,原因不明,建议不要用 DDP 做太复杂的自定义模型的分布式训练,改用 Deepspeed 或许会有用,参考 https://github.com/pytorch/pytorch/issues/46166 https://github.com/lucidrains/reformer-pytorch/issues/19- 编译自定义算子卡在
_jit_compile->baton.wait()->time.sleep(self.wait_seconds),是因为之前编译到一半中断了,存在文件锁,目录为~/.cache/torch_extensions/xxx,删掉里面的文件锁或者直接删掉目录都行 can't optimize a non-leaf Tensor:.cuda()放在最前面(.requires_grad或torch.nn.Parameter定义前),也就是不要把搬到显卡内存的操作加入到计算图中- 使用 dataloader 出现
fd_event_list = self._poll.poll(timeout)卡死问题- 可能是某些库之间互锁导致( https://github.com/DayBreak-u/Thundernet_Pytorch/issues/12 、 https://github.com/pytorch/pytorch/issues/33296 )
- dataloader 似乎设置 worker 0 也用了 multithread ??为什么??
- 偶尔在使用 TensorRT 测试后一段时间内会固定出现,偶尔不使用 TensorRT 也会突然出现,偶而会频繁出现,偶而会完全消失,在另一个镜像中使用相同代码访问同个云盘同步测试没有出现过该问题。故原因未知,或许是系统层问题,或许和 torch1.10.1+torch-tensorrt1.0.0+tensorrt8.03+cuda10.2+py3.6 镜像有关,又或许和 PIL I/O 有关
RecursionError: maximum recursion depth exceeded- notebook autoreload 出现的问题,为了避免栈溢出限制了递归深度,可以简单加大深度上限
sys.setrecursionlimit(100000)解决 - 如果是算法出现该问题则说明算法递归次数过多,存在风险
- notebook autoreload 出现的问题,为了避免栈溢出限制了递归深度,可以简单加大深度上限
return torch._C._cuda_synchronize(): RuntimeError: CUDA error: out of memory- 线上环境经常出现的问题,应该就是单纯的显存不足? https://discuss.pytorch.org/t/pytorch-cuda-synchronize-out-of-memory/9502/2?u=lamply
AttributeError: Caught AttributeError in DataLoader worker process 0:dataset 里的代码出现错误,比如使用没定义变量什么之类的- benchmark 时间隔出现长耗时的推理,有 CUDA 同步。多次执行单次推理则不会有该问题
- 只在 V100 开发环境里出现问题,T4 线上版本环境里尝试没有该问题
- dataloader 卡死,卡死的触发时间不定,可能是一开始就卡死,可能是后面才卡死,可能完全卡死也可能只卡死几分钟 [[2022-01-19#Tracking]] [[2022-01-20#Tracking]]
- 据说是可能是 OOM 导致线程被 kill,实际测试无明显规律,估计是机器问题
- 同时使用 libtorch 和 pytorch 会导致链接混乱,采用同一版本或许能解决,不清楚
- 似乎之前的版本 torch_tensorrt 即使 ldd 发现有部分库没链接到也能成功导入,只是会报一个找不到 cuda 的错,而在
import torch; torch.cuda.current_device()后再导入则没有这个错,是不是意味着某种程度上两个库被混着用了
- 似乎之前的版本 torch_tensorrt 即使 ldd 发现有部分库没链接到也能成功导入,只是会报一个找不到 cuda 的错,而在
undefined symbol: cuDevicePrimaryCtxRelease_v2:安装 cupy 出错,用ldd+objdump -xT查看符号链接,需要安装的显卡 CUDA 版本大于 450,然后就是看看libcuda.so有没有链接错torch.linalg.lstsq()在 CUDA 使用时出现异常值,似乎是其 CUDA 实现的 drivergels只支持输入是满秩的,否则会有问题(输入全为零时能复现),可以手动写伪逆实现,或者加正则项解决RuntimeError: one of the variables needed for gradient computation has been modified by an inplace operation:可能是+=这种 inplace 操作以及切片之类的操作合在一起,导致 tensor 没法整体计算反传导致,需要切开计算图节点,分成两个 tensor 相加ONNX Unable to cast from non-held to held instance:神奇问题,重启 notebook 或者去掉 vscode 断点再试试RuntimeError: element 0 of tensors does not require grad and does not have a grad_fn:用了不可微操作或者在某个地方可能全局禁用了梯度,也可能是 notebook 问题,重启完事- 训练全 nan,而且耗时长了一倍:调整为限制显存的虚拟显卡后出现的问题,托管训练没问题
RuntimeError: Unexpected error from cudaGetDeviceCount(). Did you run some cuda functions before calling NumCudaDevices() that might have already set an error? Error 804: forward compatibility was attempted on non supported HW:pytorch CUDA 无法使用,详情见 [[CUDA环境兼容探究-202212051108]]UnicodeDecodeError: 'utf-8' codec can't decode byte 0xa4 in position 2: invalid start byte:读取老版本 pytorch 模型时出现的问题,添加编码参数就好torch.load(xxx, encoding='latin1')RuntimeError: CUDA error: the provided PTX was compiled with an unsupported toolchain.:在 notebook 上使用编译正常的自定义算子的 cuda 时出现的问题。似乎是 CUDA 版本兼容问题RuntimeError: RuntimeErrorExpected to have finished reduction in the prior iteration before starting a new one.:分布式训练时模型前向输出中存在没有用于计算的输出导致,一种内在的使用缺陷,需要确保模型输出全部在 loss 计算中用上- 出现
CUDA error相关问题:新版 pytorch 会自动安装 cuda 相关库,和自带的 cuda 冲突然后出现问题,再次安装降级版本后恢复正常 - 变量设置
requires_grad失效,autograd 不计算后续节点的梯度:有个检测器的初始代码里设置了torch.set_grad_enabled(False)影响了全局导致的 UserWarning: CUDA initialization: CUDA unknown error...:不知道为什么突然 CUDA 出问题了,onnxruntime 也无法使用 CUDA,nvcc 显示正常,环境变量正常。重启后恢复正常,有说安装sudo apt install nvidia-modprobe后正常- 又发生了一次,似乎没解决原因。这次观察到有个 python 占用了 CUDA,看大小应该是人脸检测器,但可能是死进程占用的。此时
nvidia-smi显示正常,但休眠时进入假死状态,显卡跑马灯还在亮,无法恢复系统只能重启,具体见 [[Ubuntu系统问题#待机假死问题]]
- 又发生了一次,似乎没解决原因。这次观察到有个 python 占用了 CUDA,看大小应该是人脸检测器,但可能是死进程占用的。此时